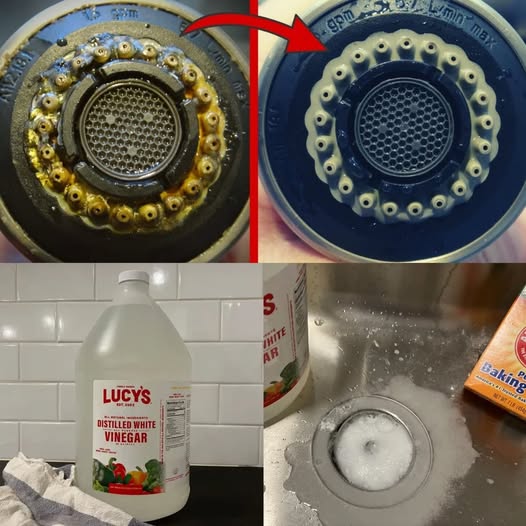
Have you ever noticed that your shower head doesn’t seem to perform as well as it once did? The water pressure might be lower, or the water may be coming out unevenly, leaving you frustrated when all you want is a refreshing shower. Over time, your shower head can accumulate mineral deposits, soap scum, and other grime that can clog the nozzles and reduce water flow. But don’t worry—there’s an easy and effective way to clean your shower head that can restore its functionality and leave it looking like new!
This simple cleaning method is not only effective but also requires minimal effort and common household ingredients. So, if you’re ready to improve your shower experience, keep reading to find out how to clean your shower head with unbelievable results.
What You’ll Need
Before you start, gather the following materials. The great part is that you likely already have most, if not all, of these items at home!
- White Vinegar: You’ll need enough white vinegar to submerge your shower head.
- Plastic Bag: A large, resealable plastic bag, big enough to fit over the shower head.
- Rubber Band or Twist Tie: This is to secure the plastic bag in place.
- Old Toothbrush or Small Cleaning Brush: For scrubbing the nozzles to remove stubborn buildup.
- Baking Soda (optional): Adds extra cleaning power for really stubborn deposits.
Step-by-Step Guide
Now, let’s walk through the easy process of cleaning your shower head. In just a few simple steps, your shower head will be sparkling clean and functioning properly again.
1. Fill the Plastic Bag with Vinegar
Start by filling the plastic bag halfway with white vinegar. You want to make sure that there is enough vinegar in the bag to completely submerge the shower head’s nozzles. The vinegar’s acidity will dissolve the mineral deposits, soap scum, and any other grime that’s built up inside your shower head. The longer it soaks, the more effectively it will clean.
2. Attach the Bag to the Shower Head
Once the plastic bag is filled with vinegar, carefully place it over the shower head so that the nozzles are fully submerged in the liquid. If your shower head is particularly large, you might need to adjust the amount of vinegar to ensure it covers all the nozzles. Use a rubber band or twist tie to secure the bag tightly around the neck of the shower head, making sure that it stays in place and doesn’t slip off. This step is crucial because you want to give the vinegar enough time to break down the buildup without it leaking out.
3. Let It Soak
Now comes the waiting game. Let the shower head soak in the vinegar for at least 30 minutes. If the mineral buildup is particularly stubborn, you can leave it to soak for up to an hour or even overnight for more stubborn deposits. The longer you let it sit, the better the vinegar will penetrate and dissolve the grime. During this time, the vinegar will work to loosen the minerals, soap scum, and other debris that have clogged the nozzles and affected the water flow.
4. Remove the Bag and Rinse
Once the soaking time is up, carefully remove the plastic bag from the shower head. Be cautious as it may contain some vinegar residue. Pour the used vinegar down the drain, and run hot water through the shower for a few minutes to rinse away any remaining vinegar and loosened grime. This step ensures that the vinegar doesn’t linger on your shower head and that any debris is flushed away properly.
5. Scrub the Nozzles (Optional)
After rinsing, inspect the shower head for any remaining buildup. If you notice stubborn deposits that haven’t fully dissolved, grab an old toothbrush or small cleaning brush. Gently scrub the nozzles to remove any lingering debris. Use light pressure to avoid damaging the shower head, and pay close attention to the areas where mineral buildup is most prominent. A toothbrush is ideal for this task as its bristles can get into the small crevices and thoroughly clean the nozzles.
6. Baking Soda Scrub (Optional)
For those extra tough spots, you can add a little extra cleaning power by using baking soda. Sprinkle a small amount of baking soda onto your toothbrush and scrub the nozzles. Baking soda is mildly abrasive and helps to scrub away any remaining grime without scratching or damaging the surface. It’s also a natural deodorizer, so your shower head will not only be cleaner but will smell fresh as well. Once you’ve scrubbed the nozzles, rinse the shower head thoroughly with water to remove any remaining baking soda.
7. Polish and Enjoy
Once your shower head is clean and free from mineral deposits and grime, you can finish up by polishing it. If your shower head is made of metal, use a soft cloth to gently polish it and restore its shine. This is a great way to make the shower head look brand new, especially if it had developed any water spots or tarnishing. Then, turn on the shower and enjoy the improved water pressure and flow!
Why This Method Works
White Vinegar
White vinegar is an incredibly effective cleaning agent, especially when it comes to removing mineral deposits and soap scum. The reason vinegar works so well is because it contains acetic acid, which helps break down calcium, lime, and other minerals commonly found in hard water. As the vinegar sits on the shower head, it dissolves these deposits, clearing the nozzles and restoring water flow. This method is not only effective but also affordable, making it a perfect solution for a clean shower head.
Baking Soda
Baking soda is a mild abrasive that can help scrub away grime without damaging delicate surfaces. When combined with vinegar, the two create a powerful cleaning duo that can tackle even the toughest buildup. While vinegar does the heavy lifting by dissolving mineral deposits, the baking soda provides extra scrubbing power, ensuring that even stubborn debris is removed. The gentle abrasiveness of baking soda is perfect for cleaning without scratching or harming the surface of your shower head.
Soaking
Allowing the shower head to soak in vinegar is a key step in this process. The extended exposure to vinegar allows the solution to penetrate deeply into the nozzles and dissolve the buildup, even in hard-to-reach areas. The longer the shower head soaks, the more effective the cleaning process will be, ensuring that all the deposits are removed and that the shower head is restored to its optimal functionality.
Tips for Maintaining a Clean Shower Head
Now that you’ve cleaned your shower head and seen the unbelievable results, it’s important to maintain it so it stays in good condition. Regular cleaning and some simple maintenance tips will help ensure that your shower head continues to function properly for months to come.
Regular Cleaning
Even if you don’t notice any immediate buildup, it’s a good idea to clean your shower head every few months. Regular cleaning will prevent any accumulation of mineral deposits, soap scum, or grime, keeping your shower head functioning optimally. By staying on top of it, you’ll avoid the need for deep cleaning sessions that require more effort.
Use a Water Softener
If you live in an area with hard water, you may experience faster mineral buildup in your shower head. Installing a water softener can reduce the number of minerals in your water, extending the time between cleanings and preventing mineral deposits from forming in the first place. A water softener will improve not only your shower head but also other appliances and plumbing fixtures throughout your home.
Wipe Down
After each shower, take a moment to wipe down the shower head with a dry cloth. This simple habit will help remove any lingering water droplets and prevent them from evaporating and leaving mineral deposits behind. If you’re particularly concerned about hard water stains, a quick wipe after every shower can go a long way in keeping your shower head clean and clear.
Conclusion
Cleaning your shower head doesn’t have to be a time-consuming or frustrating task. With this easy and effective vinegar method, you can restore your shower head’s functionality, improve water flow, and enhance your overall shower experience—all without spending a fortune on expensive cleaning products or tools. By following the simple steps above and maintaining a regular cleaning routine, your shower head will continue to perform like new. Don’t just take our word for it—try it out yourself and see the unbelievable results! You’ll be amazed at how easy and effective this cleaning method is. Happy showering!