Transforming simple Dollar Store metal utensil holders into chic outdoor lanterns is an ingenious and budget-friendly way to elevate your garden or patio décor. With just a few inexpensive supplies and a little creativity, this clever DIY turns an overlooked kitchen item into a stunning lighting feature that looks straight out of a high-end home catalog.
What makes this project especially appealing is how accessible it is. You don’t need advanced crafting skills or costly tools—just a willingness to experiment and a vision for your space. Whether you’re decorating for summer evenings, hosting backyard gatherings, or simply want to add a warm glow to your outdoor area, these DIY lanterns deliver impressive results on a tight budget.
Even better, they’re endlessly customizable. From rustic and farmhouse to modern and minimalist, these lanterns can be styled to suit almost any outdoor aesthetic.
DIY Outdoor Lantern From Dollar Store Utensil Holders
These lanterns prove that great design doesn’t have to come with a hefty price tag. With a little effort, a basic metal utensil holder can become a statement piece that looks far more expensive than it actually is.
Materials
- Metal utensil holders from the Dollar Store (quantity as desired)
- Battery-operated LED fairy lights or LED tea lights
- Drill with a small metal drill bit
- Protective gloves
- Safety goggles
Optional Materials:
- Spray paint in your desired color
- Clear sealant spray for outdoor use
Directions
(Continued on the next page style content adapted for full article)
- Clean the Utensil Holders
Begin by thoroughly cleaning the metal utensil holders to remove dust, grease, or residue. This ensures smooth drilling and better paint adhesion if you choose to customize the color. - Plan Your Design
Decide on a pattern for your lantern. You can go freehand or lightly sketch your design using a pencil or marker. Popular options include dots, stars, stripes, or repeating geometric shapes. - Drill the Holes Safely
Put on protective gloves and safety goggles. Using a drill with a small metal drill bit, carefully pierce the utensil holder following your chosen pattern. Take your time and space the holes evenly to create a balanced, professional-looking design. - Customize With Paint (Optional)
If you want to elevate the look even further, spray paint the utensil holder in your desired color. Matte black, brushed gold, copper, or white all create stunning results. Allow the paint to dry completely before moving on. - Seal for Outdoor Use (Optional)
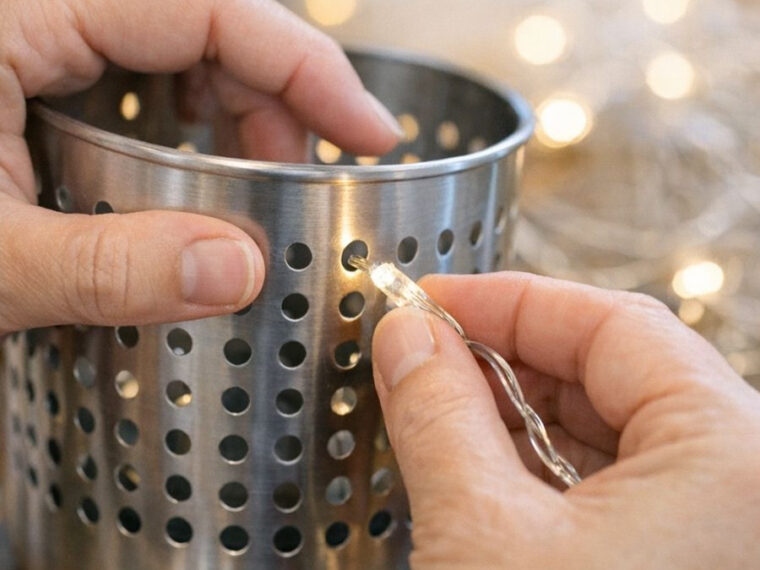
Once the paint is dry, apply a clear sealant spray to protect the finish from moisture and outdoor elements. This step is especially helpful if the lanterns will be exposed to rain or humidity. - Add the Lights
Insert battery-operated LED fairy lights or tea lights into the utensil holder. Arrange them evenly so the light shines through the drilled holes, creating a beautiful patterned glow. - Display Your Lanterns
Place your lanterns wherever you want to add ambiance—hang them from hooks or tree branches, line them along steps, or use them as table centerpieces for evening gatherings.
Why This Hack Looks So Expensive
The magic of this project lies in the contrast. The industrial look of pierced metal paired with soft, glowing light mimics the aesthetic of boutique lanterns that often sell for $40 or more. When grouped together or styled thoughtfully, these DIY lanterns create depth, warmth, and visual interest—hallmarks of high-end outdoor design.
Because the utensil holders are metal, the light reflects beautifully through the holes, casting intricate shadows that elevate the overall effect.
Styling Ideas for Different Outdoor Aesthetics
- Rustic or Farmhouse: Pair lanterns with wooden furniture, neutral cushions, and natural textures like jute or linen.
- Modern or Minimalist: Stick to monochrome colors such as black or white and place lanterns in clean, symmetrical arrangements.
- Bohemian: Use warm metallic tones, hang lanterns at varying heights, and layer them with plants and textiles.
- Vintage: Apply a patina or aged-metal spray finish for an old-world charm.
Variations & Tips
- Experiment with different hole patterns such as floral designs, abstract art, or repeating lines.
- Mix utensil holders of different sizes and shapes to create a more dynamic display.
- Try vibrant colors for a playful, whimsical look or muted tones for elegance.
- Use solar-powered lights for an eco-friendly, maintenance-free option.
- For added flair, hang multiple lanterns together to create a cascading light feature.
A Small Project With Big Impact
This Dollar Store hack is a perfect example of how creativity can completely transform everyday items. With minimal cost and effort, you can design lighting that feels intentional, stylish, and uniquely yours.
Whether you’re decorating for a party or simply want to enjoy your outdoor space after sunset, these DIY lanterns prove that beautiful design doesn’t have to be expensive—it just has to be clever.
Sometimes, the most impressive home upgrades start in the most unexpected places… like the utensil aisle at the Dollar Store.