Imagine enjoying the rich, sun-ripened taste of fresh tomatoes in the middle of winter, without losing any of their natural flavor. If you have access to fresh tomatoes, why not turn them into delicious homemade preserves that can last for months—or even years? In this article, you’ll discover a simple, reliable method to extend their freshness and enjoy their taste long after the harvest season is over.
Why Make Your Own Tomato Preserves?
Making your own tomato preserves is like capturing summer in a jar. Instead of relying on store-bought sauces that often contain additives and preservatives, you can enjoy a pure, natural taste that enhances your meals.
Homemade tomato preserves offer several advantages:
- Better flavor: Fresh tomatoes preserved at their peak retain their natural sweetness and acidity.
- Healthier option: You control every ingredient, avoiding unnecessary chemicals or artificial additives.
- Cost-effective: Buying tomatoes in season and preserving them can save money over time.
- Versatility: Preserved tomatoes can be used in soups, sauces, stews, and countless recipes.
By investing a little time in preparation, you ensure a supply of high-quality tomatoes all year round.
Choosing the Right Tomatoes
The quality of your preserves depends heavily on the tomatoes you select. Not all tomatoes are created equal when it comes to long-term storage.
Here’s what to look for:
- Ripe but firm tomatoes: Overripe tomatoes may spoil quickly, while underripe ones lack flavor.
- No bruises or blemishes: Damaged areas can lead to bacterial growth.
- Dense varieties: Roma or plum tomatoes are ideal because they have less water and more flesh.
Freshness is key. The better your tomatoes at the start, the better your final result.
The Secret to Long Preservation Without Vinegar
Many traditional preservation methods rely on vinegar for acidity and preservation. However, this method allows you to preserve tomatoes naturally, without altering their taste.
The key lies in three essential factors:
- Sterilization
- Proper sealing
- Controlled heat processing
By eliminating bacteria and creating an airtight environment, you can safely store tomatoes for up to two years.
Step-by-Step Method
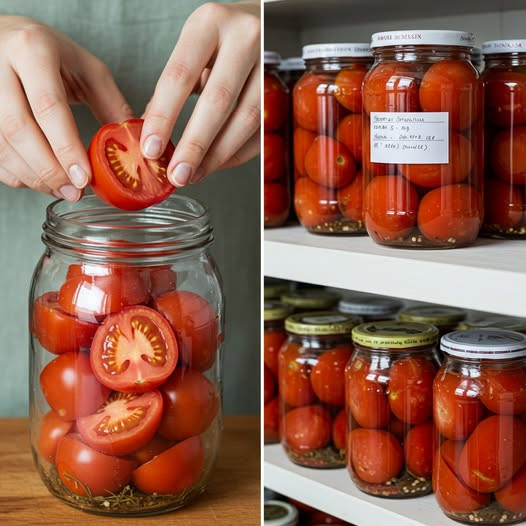
1. Wash and Prepare the Tomatoes
Start by thoroughly washing your tomatoes under running water. Remove any dirt or impurities.
Next:
- Remove the stems
- Cut away any damaged parts
- Leave small tomatoes whole or cut larger ones into halves or quarters
You can also peel the tomatoes if you prefer a smoother texture. To do this, blanch them in boiling water for 30 seconds, then transfer them to cold water—the skins will slide off easily.
2. Sterilize Your Jars
Sterilization is one of the most critical steps in this process. It prevents contamination and ensures long shelf life.
To sterilize jars:
- Wash them with hot, soapy water
- Rinse thoroughly
- Place them in boiling water for 10 minutes or in an oven at 100°C (212°F) for about 15 minutes
Don’t forget to sterilize the lids as well.
3. Fill the Jars
Place your prepared tomatoes into the sterilized jars. Press them gently to remove air pockets, but avoid crushing them too much.
Optional additions:
- A pinch of salt for flavor
- Fresh herbs like basil or thyme
Do not add vinegar—this method preserves the natural taste of tomatoes.
Leave about 1–2 cm of space at the top of each jar.
4. Seal the Jars
Wipe the rims of the jars to ensure they are clean and dry. Then seal them tightly with sterilized lids.
A proper seal is essential to prevent air from entering and spoiling the contents.
5. Heat Processing (Water Bath Method)
Next page