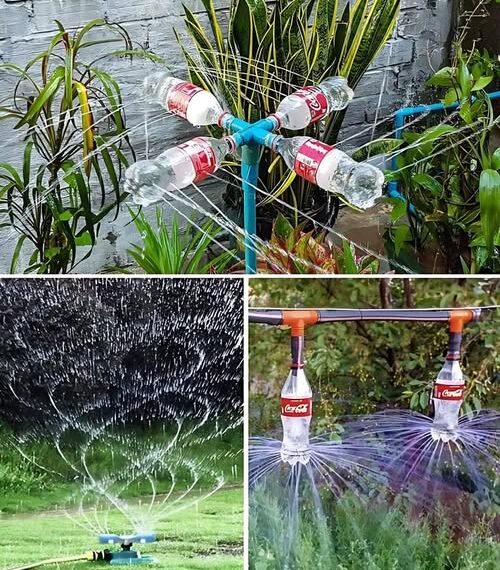
Before you get into the details of installation, it’s time to plan where each bottle will go. Are you watering a flower bed, a vegetable patch, or a few individual plants? The layout of your system will depend on what you’re growing.
If you’re watering a flower bed, place the bottles evenly spaced around the perimeter. For a vegetable patch, focus on areas with high water demand, like tomatoes or cucumbers. If you have individual plants that need more attention, position the bottles closer to them for targeted watering.
Additionally, if you’re using a hose or PVC pipe to feed water to your bottles, make sure the pipe is long enough to reach all of the bottles. Consider the distance between each bottle and how much space you have available in your garden.
Step 4: Add Watering Holes
Once your bottles are ready and your layout is planned, it’s time to add the holes that will release the water. Take your drill, nail, or another sharp tool, and create small holes around the sides of each bottle. These holes will act as mini sprinklers, releasing water evenly into the surrounding soil.
You can create anywhere from 3 to 8 holes per bottle, depending on how much water you want to release. More holes will allow for quicker, more even water distribution, while fewer holes will slow down the watering process. If you want more control over the watering, consider adjusting the size of the holes. Smaller holes will produce a gentle drip, while larger ones will create a heavier flow.
Tip: Try to make the holes towards the top of the bottle, so the water trickles down gently without splashing all over the place.
Step 5: Anchor the Bottles
With the bottles prepped and ready to go, it’s time to place them in the garden. Turn the bottles upside down and place them at the spots you’ve marked in your layout. Push them a few inches into the soil to keep them stable.
If you find that your soil is loose or sandy, you might need to weigh down the bottles for extra stability. Fill the bottles with a little sand or small gravel to keep them grounded. You can also tape the bottles to sticks or garden stakes to provide additional support, especially if the bottles are at risk of tipping over from wind or movement.
Tip: Ensure the bottles are positioned properly, so the water can flow out easily. The bottles should sit upright, with the base facing down and the cut edge facing the soil.
Step 6: Connect and Test
Now, it’s time to connect your system. If you’re using PVC pipe, connect it to a water source, like a faucet or garden hose. Make sure the pipe is positioned to feed water into each of the bottles. If you’re using a hose, simply direct the hose into the opening at the top of the PVC pipe.
Once everything is connected, turn on the water to test the system. Check to see how the water flows from each bottle. If some bottles are not releasing water evenly, you may need to adjust the size of the holes or ensure that the water pressure is set correctly.
As you monitor the system, adjust the water pressure to ensure a steady and even flow across all the bottles. Too much water pressure could cause uneven watering, while too little might result in dry spots in your garden.
Step 7: Keep It Running Smoothly
Like any good garden system, your rotating irrigation setup will require regular maintenance. Make it a habit to check the bottles periodically to ensure that the holes aren’t clogged with dirt, debris, or algae buildup. If any of the holes are blocked, give the bottles a quick rinse with water to clear them out.
It’s also a good idea to monitor the soil moisture to make sure you’re not overwatering or underwatering your plants. If you notice the soil is constantly soggy, reduce the watering frequency or adjust the water pressure. On the other hand, if the soil is dry, you may need to increase the watering time or add more bottles to the system.
Additional Tips for Success
- Add a Timer: If you want to take the hassle out of manual watering, consider adding a simple timer to your water source. A timer will allow you to automate the irrigation process, ensuring your plants receive consistent water throughout the day.
- Recycling for the Win: This rotating irrigation system is not only practical but also environmentally friendly. By reusing plastic bottles, you’re keeping waste out of landfills while providing your plants with the hydration they need. It’s a perfect example of how small changes can make a big impact!
- Regularly Check Water Flow: Ensure the water pressure doesn’t change drastically over time. Sometimes, hose connections can loosen, and pipes may clog, reducing water flow. Check the system every few weeks to keep it running smoothly.
Conclusion
Turning plastic bottles into a DIY rotating irrigation system is an innovative and sustainable way to care for your plants while conserving water. It’s easy, affordable, and an excellent way to repurpose items you already have lying around your home. With a little time and effort, you can create a system that not only waters your garden efficiently but also helps reduce your water consumption.
So why not give it a try? By repurposing plastic bottles, you’ll be able to save money, water, and help the environment, all while keeping your garden lush and thriving.