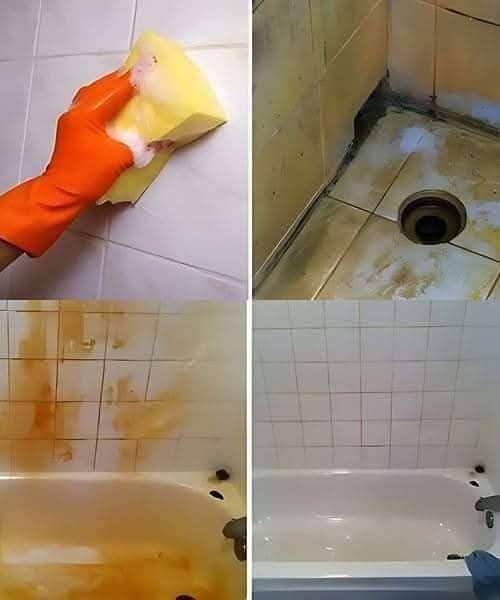
Bathrooms are spaces we use every day, yet they can easily fall victim to one of the most persistent and annoying cleaning challenges: soap scum and water stains on tiles. Over time, these build-ups accumulate, dulling the appearance of your bathroom surfaces and making it difficult to maintain a fresh, clean environment. Whether you have ceramic, porcelain, or stone tiles, the combination of soap, water, and mineral deposits creates the perfect breeding ground for stains and grime. The good news is that you don’t need to buy expensive cleaning products or spend hours scrubbing your bathroom. With a few simple, everyday ingredients, you can easily clean bathroom tiles and restore them to their sparkling best.
This comprehensive guide will provide you with an effective and natural method for removing soap scum, water stains, and other grime from your bathroom tiles. Using common household products like apple cider vinegar, baking soda, dishwashing detergent, toothpaste, and lemon juice, you can effortlessly banish dirt, grime, and limescale without the need for harsh chemicals. Read on to discover how this easy, eco-friendly cleaning solution can transform your bathroom into a shining haven.
Ingredients You’ll Need
- 2 tablespoons of apple cider vinegar
- 2 tablespoons of baking soda
- 1 tablespoon of dishwashing detergent
- 2 tablespoons of toothpaste
- Juice of half a lemon
- Sponge
- Microfiber cloth or paper towels (optional for drying)
These simple ingredients can be combined into a powerful paste that can take care of soap scum, hard water deposits, and other build-ups that mar the beauty of your bathroom tiles.
Step-by-Step Instructions for Cleaning Bathroom Tiles
Step 1: Prepare the Cleaning Paste
Start by gathering all the ingredients needed for the cleaning mixture. In a medium-sized bowl, combine 2 tablespoons of apple cider vinegar, 2 tablespoons of baking soda, 1 tablespoon of dishwashing detergent, 2 tablespoons of toothpaste, and the juice of half a lemon. The apple cider vinegar will help to dissolve soap scum, while the baking soda provides a gentle abrasive action to scrub away grime. The dishwashing detergent will help break down grease, and the toothpaste contains mild abrasives and whitening agents to tackle stubborn stains.
Mix these ingredients thoroughly until you achieve a smooth, creamy paste. If the paste feels too thick, you can add a small amount of water to loosen it up to a spreadable consistency. The goal is to make sure that the mixture can be applied evenly to the tiles and grout, but not so runny that it drips off easily.
Step 2: Apply the Paste to the Tiles
Now that you have your cleaning paste ready, it’s time to apply it to your bathroom tiles. Take a sponge or cleaning cloth and dip it into the paste, ensuring it is soaked in the mixture. You’ll want to gently rub the sponge over the surface of the tiles, working it into the grout lines and corners where grime and soap scum tend to accumulate. The natural abrasives in the mixture will break down the build-up without damaging the tiles.
Be sure to focus on areas with visible water spots, soap scum, or other stains. Don’t be afraid to apply a generous amount of paste to stubborn spots. It’s always better to apply a little more than too little.
Step 3: Let the Mixture Sit
After you’ve thoroughly applied the paste to your tiles and grout, leave it to sit for 10 minutes. This allows the mixture to work its magic by breaking down stubborn soap scum, limescale, and mineral deposits. During this time, the acidic properties of the vinegar and lemon juice will dissolve the minerals that cause water stains, while the toothpaste’s mild abrasives will gently lift any stuck-on debris.
Step 4: Scrub and Rinse
Once the paste has had time to sit, it’s time to scrub the tiles gently. Take the same sponge or a soft-bristled brush, and using circular motions, scrub the surfaces to dislodge the loosened grime. Focus on grout lines, corners, and any areas with heavier build-up. The combination of baking soda and toothpaste will help lift even the most stubborn stains without scratching your tiles.
Once you’ve finished scrubbing, rinse the tiles thoroughly with clean water to wash away any residue from the paste. Be sure to wipe the grout lines as well to ensure they are free of excess paste.
Step 5: Dry and Buff for a Streak-Free Finish
If your bathroom does not have excellent ventilation or if you simply want to achieve a shiny, streak-free finish, take a microfiber cloth or paper towels to dry the tiles. This step is important to ensure there are no water spots left behind. The soft fibers of a microfiber cloth will absorb excess moisture while gently buffing the tiles to a high shine.
Additional Tips for Keeping Your Tiles Sparkling Clean
While the above method works wonders, here are some additional tips to help you maintain your bathroom tiles and keep them sparkling clean longer:
- Preventing Build-Up:
Use this cleaning mixture at least once a week to prevent soap scum and mineral build-up from accumulating. Regular maintenance can reduce the need for deep cleaning and ensure your bathroom tiles stay shining. - Squeegee After Each Shower:
Water spots and soap scum build up quickly in the bathroom, so after every shower, use a squeegee to wipe down the tiles and glass. This helps remove excess water and prevent mineral deposits from forming. - Keep the Bathroom Ventilated:
Good ventilation is essential for keeping your bathroom dry and reducing the likelihood of soap scum and water stains. Use an exhaust fan or open a window during and after showers to help the bathroom dry quickly. - Use a Mild, pH-Balanced Cleaner:
Instead of using harsh chemical-based cleaners, opt for natural, pH-balanced cleaning solutions. Vinegar, lemon juice, and baking soda are all excellent alternatives for safely cleaning your bathroom tiles without the need for toxic chemicals. - Clean the Grout Regularly:
Grout lines can accumulate dirt and mold, so they require special attention. In addition to the paste mentioned above, you can use a toothbrush dipped in hydrogen peroxide to scrub the grout for a deep clean. This will help remove mildew and brighten the grout for a fresh, new look. - Rinse Thoroughly After Use:
If you notice water spots forming on your tiles after use, take a moment to rinse the tiles with clean water and wipe them down. This will prevent mineral build-up and keep the tiles from becoming dull over time.
Effective Cleaning of Grout: Whitening and Brightening Your Grout Lines
Grout can be one of the hardest areas to clean in a bathroom, as it’s often porous and prone to staining. However, using the right techniques can make all the difference. Here are two methods for effectively cleaning and whitening your grout lines:
1. Baking Soda Paste
Baking soda is a fantastic natural cleaner for grout. To clean your grout lines, make a thick paste by mixing baking soda with a little water. Dip an old toothbrush into the paste and scrub it into the grout lines. Focus on areas with visible stains or discoloration. Let the paste sit for about 5 minutes, then rinse with warm water and dry with a cloth.
2. Hydrogen Peroxide
Another effective solution is hydrogen peroxide, which can be used to disinfect and brighten grout lines. Dip a toothbrush into hydrogen peroxide and gently scrub the grout lines. Let it sit for a few minutes before rinsing with warm water and drying the area. This method helps to kill germs and remove stubborn stains, leaving your grout looking fresh and clean.
Conclusion
Keeping your bathroom tiles and grout clean doesn’t have to be a difficult or expensive task. By using natural, household ingredients, you can create a powerful cleaning solution that effectively tackles soap scum, water stains, and other grime. With a little bit of time and effort, you can maintain a fresh and sparkling bathroom with tiles that shine like new. Incorporating this cleaning routine into your weekly maintenance schedule will ensure that your bathroom remains looking beautiful and hygienic, with minimal hassle.