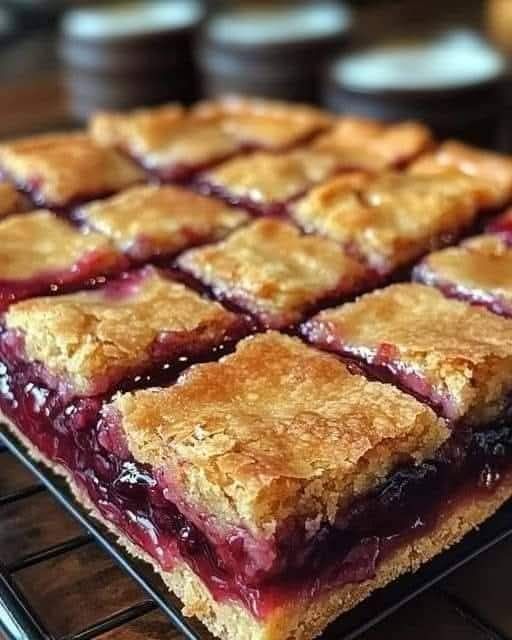
Homemade Cherry Pie Bars are the perfect combination of a crispy, buttery crust, sweet and tart cherry filling, and a crumbly topping. This delicious dessert allows you to enjoy all the flavors of a classic cherry pie but in an easy-to-make bar form. Whether you are looking to impress your guests at a party, or just want to treat yourself to something sweet, these Cherry Pie Bars are sure to become a new favorite.
Why Choose Cherry Pie Bars?
Cherry pie bars are a fantastic alternative to traditional cherry pies. They offer the same wonderful taste, but without the hassle of making a pie crust from scratch. This recipe is easy to follow and doesn’t require any special skills or equipment, making it perfect for beginner bakers. The best part is that you don’t have to worry about a pie crust that might get soggy or fall apart when cutting. These bars give you perfect portions every time.
Ingredients for the Crust and Topping:
- 1.5 cups (188g) all-purpose flour – This is the base of the crust, and you’ll need to measure it correctly to get the right texture for your bars.
- 1 cup old-fashioned rolled oats (85g), divided – Oats add texture to the crust and topping, making it pleasantly chewy while still holding together well.
- 0.5 cups (100g) brown sugar – You can use either light or dark brown sugar; both work well in this recipe and add depth of flavor.
- 1 teaspoon baking powder – This helps the crust and topping rise slightly and become light and airy.
- 1 teaspoon grated lemon peel – Adds a fresh, zesty note to balance the sweetness of the cherries.
- 1/8 teaspoon salt – Enhances the flavors of the other ingredients and balances the sweetness.
- 10 tablespoons melted unsalted butter (142g) – Butter provides richness and helps the crust become golden and crispy.
- 1 teaspoon pure vanilla extract – Adds a warm, aromatic flavor to the crust and topping.
Ingredients for the Cherry Filling:
- 1.5 tablespoons cornstarch (11g) – This helps thicken the cherry filling and gives it the right consistency.
- 3.5 cups (525g) frozen sour cherries – Frozen sour cherries work best for this recipe. Be sure not to thaw them before using, as they will release excess moisture and affect the texture.
- 0.5 cup (100g) white sugar – The white sugar balances the tartness of the cherries and gives the filling sweetness.
- 1 teaspoon freshly squeezed lemon juice – The lemon juice brightens the flavor of the cherries and enhances their natural tartness.
- 1/4 teaspoon almond extract – Adds a subtle almond flavor that complements the cherries beautifully. If you don’t have almond extract, you can skip it or use a small amount of vanilla extract instead.
Optional Icing:
- Almond icing (optional) – Almond icing is a delicious way to add a sweet finishing touch to these bars. It’s not required, but it enhances the flavor and makes the bars look extra special.
Preparation Instructions:
1. Prepare the Crust and Topping:
To begin, preheat your oven to 350°F (175°C). Grease a 9×13-inch baking dish or line it with parchment paper for easy removal of the bars once they’re done.
In a large bowl, combine the all-purpose flour, rolled oats, brown sugar, baking powder, lemon peel, and salt. Stir everything together to ensure the dry ingredients are well combined. Next, add the melted butter and vanilla extract to the mixture. Use a spoon or your hands to combine the butter into the dry ingredients, creating a dough-like mixture. The dough should be slightly crumbly but hold together when pressed.
Press about two-thirds of the dough into the bottom of the prepared baking dish. This forms the base layer of your cherry pie bars. Reserve the remaining one-third of the dough for the topping.
2. Prepare the Cherry Filling:
In a separate medium-sized saucepan, combine the frozen cherries, cornstarch, white sugar, lemon juice, and almond extract. Stir everything together to evenly coat the cherries with the sugar and cornstarch. Place the saucepan over medium heat and cook the mixture, stirring occasionally, until the cherries start to break down and release their juices. Continue cooking for another 5-7 minutes until the mixture thickens and becomes jam-like.
Once the filling has thickened, remove the saucepan from the heat and set it aside to cool for a few minutes.
3. Assemble the Bars:
Once the cherry filling has cooled slightly, spread it evenly over the crust layer in the prepared baking dish. Be sure to spread the cherries out to cover the entire surface.
Next, take the remaining one-third of the dough and crumble it over the cherry filling. The dough will bake into a delicious crumble topping, adding a crispy texture to each bite.
4. Bake the Bars:
Place the baking dish into the preheated oven and bake for 45-50 minutes, or until the top is golden brown and the filling is bubbling. The edges may darken slightly, but be careful not to let the crust over-brown.
Once the bars are done, remove them from the oven and allow them to cool completely in the pan before cutting them into squares. This cooling time is important because it helps the filling set and prevents it from running out when you slice the bars.
5. Optional Almond Icing:
If you’d like to add an almond icing on top of your cherry pie bars, simply whisk together powdered sugar and a small amount of almond extract (or vanilla extract) with a little milk. Drizzle the icing over the cooled bars in a decorative pattern.
6. Slice and Serve:
Once the bars have cooled completely and the icing has set (if using), slice them into 16 squares. Serve them as a dessert for a family gathering, picnic, or any occasion. These cherry pie bars are great on their own, or you can serve them with a scoop of vanilla ice cream for an extra indulgent treat.
Tips for Perfect Cherry Pie Bars:
- Use Frozen Cherries: Using frozen sour cherries ensures that the filling will be thick and not too watery. Fresh cherries can be used, but be sure to reduce the amount of liquid in the filling to compensate for the juiciness of fresh fruit.
- Don’t Skip the Cooling Time: Allow the bars to cool completely before cutting. If you try to cut them while they’re still hot, the filling may spill out and make a mess.
- Customize the Topping: If you prefer a more crumble-like topping, you can make the remaining dough a little crumblier by mixing it with additional oats. This adds more texture to the bars.
- Make Ahead: These bars can be made a day in advance and stored in an airtight container at room temperature for up to 3 days. They also freeze well, so you can make a double batch and store one in the freezer for later.
- Add a Twist: For a fun variation, try adding a layer of cream cheese or a drizzle of chocolate over the top for an extra rich and indulgent treat.
Why You’ll Love These Homemade Cherry Pie Bars:
- Simple Ingredients: The recipe uses ingredients you probably already have in your pantry and freezer. No need to run out to the store for anything special.
- Delicious Combination: The combination of a buttery crust, tart cherry filling, and crumbly topping is irresistible and makes for a perfect summer dessert.
- No Pie Crust Required: If you’re not a fan of making pie crust, this is the perfect alternative. The bars are just as delicious without the hassle of rolling out dough.
- Make It Ahead: These cherry pie bars can be made in advance, making them perfect for gatherings, potlucks, or holiday dinners.
Conclusion:
Homemade Cherry Pie Bars are the perfect dessert for any occasion. With their buttery crust, sweet cherry filling, and crumbly topping, these bars are sure to be a hit with your family and friends. Whether you enjoy them with a scoop of ice cream or on their own, they are a treat everyone will love. Make sure to save this recipe for your next baking session, and enjoy the delicious results!