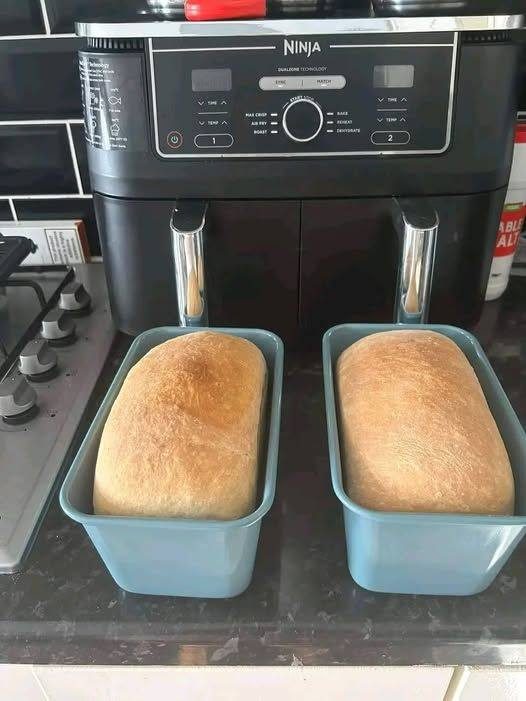
Bread, the simplest and most comforting of foods, has been a staple in households around the world for centuries. While many people associate bread-making with long, laborious hours in the kitchen, it is entirely possible to craft a delicious loaf using the air fryer—without the need for complicated techniques or specialized equipment. This method allows you to enjoy the joy of homemade bread with minimal effort and maximum flavor.
This recipe will guide you through creating soft, fluffy, and golden-brown bread using the air fryer, from the ingredients to the final slice. It’s a straightforward, no-fuss method that even beginners in the kitchen can master. Plus, you don’t need to wait hours for the dough to rise—thanks to the air fryer, you can have fresh homemade bread in no time!
Ingredients and Preparation
To start this bread-making journey, gather the following ingredients:
- 2 1/4 teaspoons (1 packet) active dry yeast
- 1 teaspoon sugar
- 1 cup warm water (110°F/43°C)
- 3 cups all-purpose flour
- 1 teaspoon salt
- 1 tablespoon olive oil
These simple ingredients are likely already in your pantry. The key to making great bread lies in the preparation and process rather than a long list of ingredients.
- Activate the Yeast
The first step in making bread is to activate the yeast. In a small bowl, combine the warm water (around 110°F or 43°C) with the sugar and yeast. Stir the mixture gently, then let it sit for 5-10 minutes. During this time, the yeast will begin to bubble and froth. This is an essential step as it ensures the yeast is active and ready to make the dough rise. - Mix Dry Ingredients
While the yeast is activating, take a large mixing bowl and combine the flour and salt. These two ingredients form the base of your dough. The salt is crucial for flavor, while the flour provides the structure for the bread. - Combine Ingredients
Once the yeast mixture has become frothy, add it to the flour mixture. Along with the yeast and water mixture, add the olive oil. Olive oil enhances the flavor of the bread, adds richness to the dough, and contributes to a soft texture. Stir the mixture until it forms a dough. It might be a little sticky at first, but that’s normal. - Knead the Dough
Turn the dough out onto a floured surface. Begin kneading it for about 5-7 minutes. The goal is to turn the dough into a smooth, elastic consistency. Kneading helps to develop the gluten in the flour, which will give the bread structure and texture. If the dough feels too sticky, add a little more flour, but be careful not to add too much, as this can result in a dense loaf. Kneading is also a great way to relieve stress! - Let it Rise
After kneading, place the dough into a lightly oiled bowl. Cover it with a damp cloth or plastic wrap and let it rise in a warm environment for about an hour, or until the dough has doubled in size. This rise is crucial as it allows the yeast to ferment and produce carbon dioxide, which will make the bread airy and light. If you live in a cooler area, you can preheat your oven to a low temperature (around 100°F or 38°C) and place the bowl inside to speed up the rising process. - Preheat the Air Fryer
While the dough is rising, it’s a good idea to preheat your air fryer to 350°F (180°C). Preheating ensures that the bread will start baking immediately once you place it in the air fryer basket, giving it the best chance to rise and bake evenly.
Shaping and Crafting the Dough
After the dough has risen, it’s time to shape it. This is where your creativity can shine. For a classic loaf shape, simply punch down the dough to release any trapped air and turn it onto a clean surface. Shape it into a loaf that fits comfortably into your air fryer basket. Don’t worry if it isn’t perfectly shaped—bread has a rustic charm, and a slightly uneven loaf will still taste delicious.
Air Fryer Baking Process
Now comes the exciting part—baking! Place your shaped dough into the preheated air fryer basket. Make sure the dough isn’t touching the sides of the basket too much, as this can affect the evenness of the baking process. Set the air fryer to 350°F (180°C) and bake for 20-25 minutes. The exact time will depend on the size of the loaf and the air fryer model, so it’s a good idea to check the bread towards the end.
You’ll know the bread is ready when it turns golden brown and sounds hollow when tapped on the bottom. If you’re unsure, use a kitchen thermometer—bread is typically done when it reaches an internal temperature of around 190°F (88°C).
The air fryer is a fantastic tool for baking bread because it creates a consistent, dry heat that helps the bread develop a crisp, golden crust while keeping the inside soft and fluffy. The air circulation within the fryer also mimics the effects of a convection oven, ensuring an even bake throughout.
Cooling and Savoring
Once your bread is baked to perfection, carefully remove it from the air fryer basket and place it on a wire rack to cool. Let it cool for at least 15-20 minutes before slicing. It’s tempting to cut into it right away, but allowing it to cool a bit will help the texture set and prevent it from becoming too gummy.
As the bread cools, the aroma that fills your kitchen will be irresistible. Slicing into the warm, golden crust reveals a soft, airy interior that will make you proud of your creation. Whether you’re enjoying it with butter, making a sandwich, or simply savoring it on its own, this homemade bread is sure to satisfy.
Optional Elegance: Add Butter for Extra Flavor
For an extra indulgent touch, you can brush the top of the bread with melted butter right after it comes out of the air fryer. This will give it a rich, golden sheen and add an extra layer of flavor. If you prefer something savory, you could sprinkle some garlic powder, herbs, or Parmesan cheese on top for an elevated taste experience.
Tips for Perfect Bread Every Time
- Room Temperature Ingredients: Ensure that your ingredients are at room temperature before using them, especially the olive oil and water. Cold ingredients can slow down the yeast activation process.
- Don’t Rush the Rising Process: Be patient when waiting for the dough to rise. If you’re in a hurry, consider using a warm place like near the stove or a slightly preheated oven to speed up the process.
- Monitor the Bread While Baking: Air fryers vary in their heat distribution, so it’s important to keep an eye on the bread as it bakes. You can always check the loaf earlier than the recommended baking time to ensure it doesn’t over-brown.
- Experiment with Flavors: Feel free to add flavorings to the dough to personalize the bread. Herbs like rosemary, thyme, or garlic, or even cheese, can elevate your loaf and make it more suitable for specific meals.
- Storage: Once your bread is cool, store it in an airtight container or breadbox to maintain its freshness. You can also freeze slices for later use. Just pop a slice in the toaster for a fresh-baked experience!
Conclusion
Making homemade bread in an air fryer is a simple and effective way to bring the joy of baking into your kitchen without the need for a conventional oven or long hours of preparation. This method yields a perfectly golden-brown loaf that’s soft on the inside and crispy on the outside. It’s a versatile recipe that can be tailored to suit your tastes, and the air fryer makes it even easier and faster than traditional methods.
With just a few ingredients, some patience, and a bit of creativity, you can enjoy the fruits of your labor in less than two hours. So, embrace this air fryer bread recipe and savor the delicious homemade goodness!


