Growing garlic in containers is an excellent way to enjoy fresh, flavorful garlic, especially if you have limited space or don’t have access to a traditional garden. Container gardening allows you to control your garlic’s growing environment, making it easier to avoid pests and providing flexibility in managing temperature conditions. With the right tools and knowledge, growing garlic from a bulb in a container is a rewarding experience that can yield delicious results, even in small spaces like patios, balconies, or windowsills.
In this guide, we’ll walk you through everything you need to know to grow garlic from a bulb in a container, including how to select the right container, prepare the soil, plant the garlic, and care for it throughout its growing cycle. By the end of this article, you’ll have the knowledge to grow your own garlic, even if you’re a beginner.
Why Grow Garlic in Containers?
Growing garlic in containers offers several advantages over traditional garden planting, especially for those with limited space or challenging soil conditions. Here are some benefits of growing garlic in containers:
- Space Efficiency: If you’re living in an apartment or a small house with limited garden space, growing garlic in containers is a great way to maximize your available area, such as a balcony, patio, or windowsill.
- Control Over Soil Quality: In containers, you have full control over the quality and type of soil used, which can result in healthier plants and a better garlic yield. This is particularly helpful if you have poor or contaminated soil in your garden.
- Pest Control: Growing garlic in containers can help you avoid common pests like nematodes, onion maggots, and other soil-borne diseases. It also reduces the need for pesticides.
- Easy Mobility: Containers allow you to move your garlic plants to a sunnier spot or away from extreme weather conditions like frost or heavy rain.
- Better Drainage: Containers provide excellent drainage, which is vital for garlic, as it is susceptible to rot in poorly drained soils.
What You’ll Need to Grow Garlic in Containers
Before you begin planting, it’s important to gather all the necessary materials. Here’s a list of supplies:
- Organic garlic bulb: Purchase a certified disease-free garlic bulb from a nursery or online seed supplier. Avoid using garlic from the grocery store, as it may be treated with growth inhibitors.
- Container: A container with drainage holes is essential. Choose a pot that is at least 12 inches deep and wide to allow enough space for the garlic to grow.
- Potting soil: A well-draining potting mix is essential. Garlic requires loose, fertile soil that drains well to prevent rot.
- Compost or organic fertilizer: These will help provide essential nutrients to your garlic throughout its growth.
- Watering can or spray bottle: To water your plants.
- Mulch (optional): Mulching helps retain moisture and can keep the roots insulated during cold months.
Step 1: Choose the Right Garlic Bulb
Not all garlic bulbs are suitable for growing in containers. There are two main types of garlic:
- Hardneck Garlic: Best suited for colder climates, hardneck garlic produces fewer, larger cloves and a flowering stalk called a scape. It tends to have a stronger, more complex flavor. While it can grow in containers, hardneck garlic may need more care and attention.
- Softneck Garlic: Ideal for warmer climates, softneck garlic produces more smaller cloves and tends to store well for longer periods. It is often recommended for container growing because it is adaptable and easier to manage.
While both types of garlic can be grown in containers, softneck garlic is typically preferred due to its adaptability and better storage qualities. Look for a high-quality, organic bulb to ensure a healthy harvest.
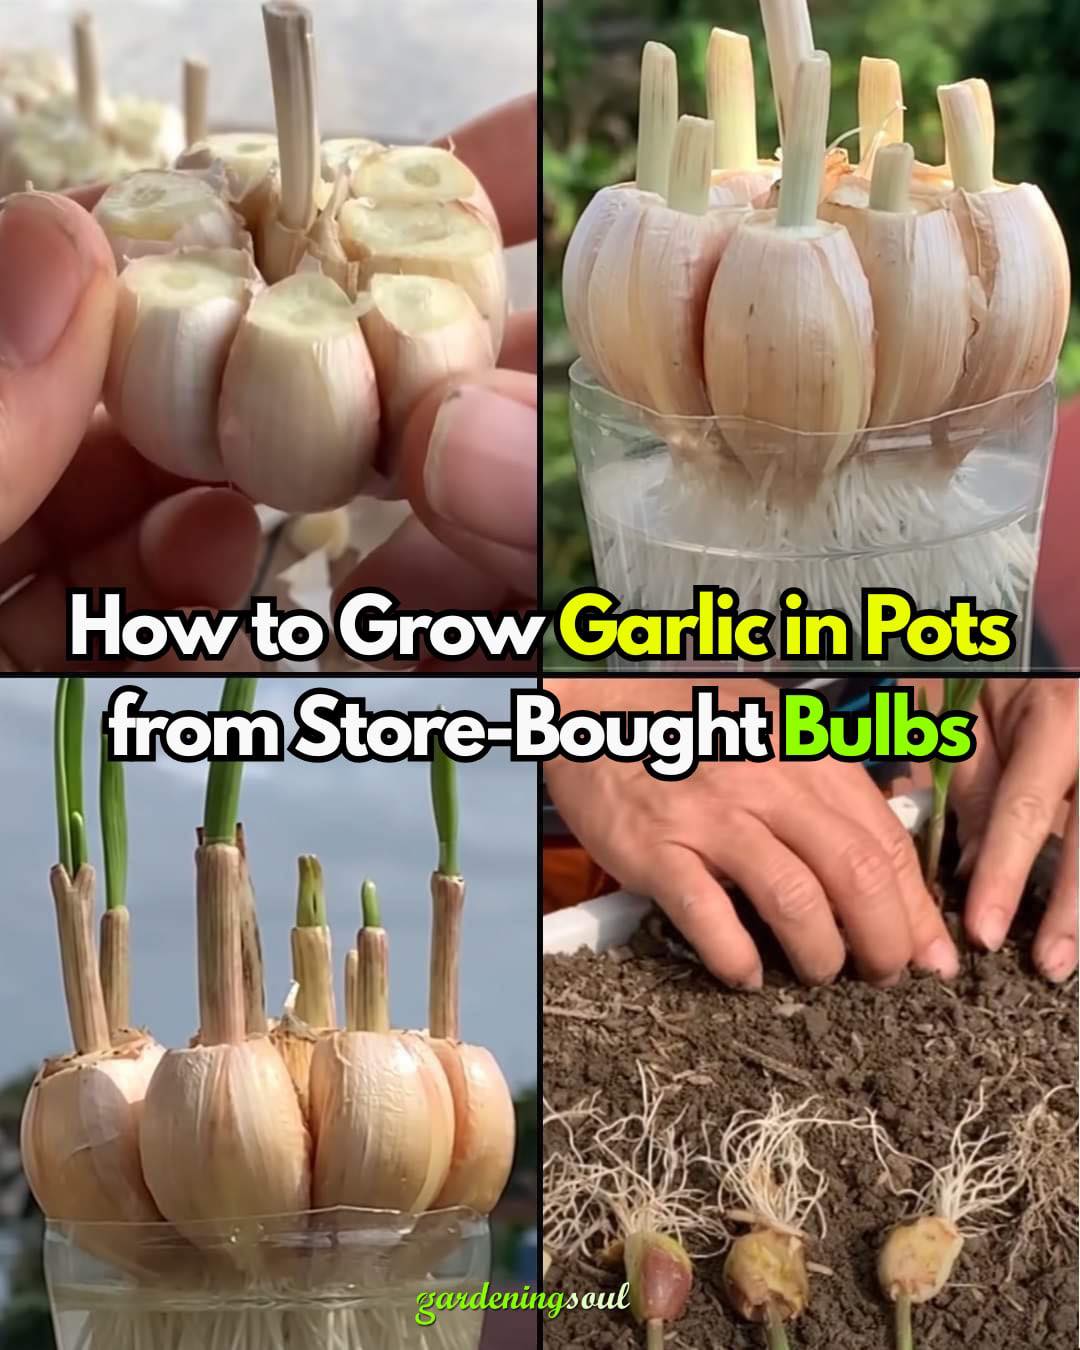
Step 2: Prepare the Garlic Cloves
Once you have your garlic bulb, break it apart into individual cloves. Be careful not to damage the cloves when peeling them from the bulb. You’ll want to use the largest, healthiest cloves, as they will produce the strongest plants.
Leave the papery skin on each clove; this helps protect it during the growing process. Avoid using the tiny inner cloves, as they tend to produce weak plants and smaller bulbs.
Step 3: Select the Right Container
Garlic needs space for its roots to grow deeply and healthily. Therefore, you’ll want to choose a container that is at least 12 inches deep and wide enough to accommodate several cloves. A large container can hold 4–6 cloves comfortably, but if you’re growing more garlic, consider using multiple containers or a larger grow bag.
Some container options include:
- Plastic pots: Lightweight and durable, these pots are often easy to move around.
- Clay pots: These pots are heavier and help with moisture retention but may be harder to move.
- Fabric pots: These provide excellent drainage and root health, making them a good choice for container gardening.
Be sure to choose a container with drainage holes to avoid waterlogging, which can lead to root rot.
Step 4: Prepare the Soil
Garlic thrives in loose, well-draining, fertile soil. To prepare the perfect soil mix for your garlic, combine the following:
- 2 parts high-quality potting mix: This provides the base of the soil for garlic growth.
- 1 part perlite or coarse sand: This will improve drainage, which is critical for garlic plants.
- 1 part aged compost or worm castings: Compost adds nutrients and promotes healthy plant growth.
Mix the ingredients thoroughly to create a loose, well-draining soil. You can also add a balanced organic fertilizer, like a 10-10-10 blend, to ensure that your garlic has enough nutrients.
Step 5: Plant the Garlic Cloves
Plant your garlic cloves with the pointed end facing up and the flat root end facing down. Bury each clove about 2 inches deep in the soil, with each clove spaced 4–6 inches apart. If you’re planting multiple rows, be sure to leave space between them for healthy root development.
Once you’ve planted your garlic, lightly firm the soil over the cloves and water gently. Garlic doesn’t require too much water at this stage, but the soil should be consistently moist (not soggy).
Step 6: Watering and Maintenance
Garlic requires consistent moisture to grow, but it does not like to sit in waterlogged soil. Water your garlic deeply once or twice a week, ensuring that the top inch of soil dries out between waterings. Be careful not to overwater, as this can lead to bulb rot. In the final month before harvest, reduce watering to allow the bulbs to mature properly.
Garlic loves sunlight, so place your container in a sunny location that gets at least 6–8 hours of sunlight per day. If you’re growing garlic indoors, make sure it gets plenty of direct light, or consider using a grow light.
Step 7: Fertilization
During the growing phase, garlic benefits from periodic feeding. About every 3–4 weeks, use an organic, nitrogen-rich fertilizer, such as fish emulsion or compost tea, to help promote healthy growth. Once garlic starts to bulb in late spring, switch to a phosphorus-heavy fertilizer to encourage the development of larger bulbs.
Stop fertilizing about a month before harvest to allow the plant to focus its energy on maturing the bulbs.
Step 8: Mulching (Optional)
Mulching around the base of the garlic can help retain moisture and prevent weeds. Organic mulches such as straw, shredded leaves, or pine needles work well for this purpose. Mulch also helps insulate the soil, protecting the roots from extreme temperatures.
Keep the mulch a few inches away from the garlic stalks to prevent moisture buildup that could lead to rot.
Step 9: Watch for Pests and Problems
Although container-grown garlic is less likely to suffer from pest problems, it’s still important to monitor your plants for issues. Common problems to watch for include:
- Aphids: These small insects can infest garlic leaves. They can be removed by spraying water or using insecticidal soap.
- Fungal rot: Overwatering can lead to fungal rot. Make sure your soil drains well and you’re not overwatering.
- Yellowing leaves: This can be a sign of overwatering, lack of nutrients, or disease. Check for proper drainage and consider feeding your garlic if needed.
Proper spacing, good airflow, and full sun can help minimize many common garlic problems.
Step 10: Harvesting Garlic
Garlic is typically ready to harvest 8–9 months after planting. Here are a few signs that your garlic is ready to be harvested:
- The lower leaves of the garlic plant begin to yellow and dry out, while the upper leaves remain green.
- The bulbs should feel firm when gently squeezed.
To harvest, carefully loosen the soil around the garlic bulb and pull it out by the base. Be gentle to avoid damaging the bulb. Brush off the loose soil, but don’t wash the bulbs.
Step 11: Curing and Storing Garlic
After harvesting, allow the garlic bulbs to cure in a dry, shaded, and well-ventilated area for 2–3 weeks. This curing process helps the bulbs dry out and develop better flavor.
Once the garlic is fully cured, trim the roots and stalks. Store the garlic in a cool, dry place with good airflow. Softneck garlic can last for up to 6–9 months if stored properly.
Bonus: Garlic Greens and Scapes
If you’re eager to enjoy your garlic earlier, you can harvest the greens. These green tops taste similar to chives but with a mild garlic flavor. They can be used fresh in salads, soups, or as a garnish.
Hardneck garlic also produces garlic scapes, curly flower stalks that grow in late spring. These scapes are edible and can be used in stir-fries, pesto, or salads.
Common Mistakes to Avoid
- Using grocery store garlic: Grocery store garlic may be treated with growth inhibitors and may not sprout.
- Overcrowding the container: This can stunt garlic growth and result in smaller bulbs.
- Planting too shallow: Garlic cloves need to be buried at least 2 inches deep to grow properly.
- Overwatering: The most common mistake is overwatering, which leads to bulb rot.
- Not enough sunlight: Garlic needs full sun to produce healthy bulbs.
Conclusion
Growing garlic in containers is a simple, rewarding process that allows you to enjoy fresh, homegrown garlic without needing a large garden. By following the steps outlined above, you can successfully grow garlic from a bulb in a container, whether you’re a beginner or an experienced gardener. From planting to harvesting, this method provides flexibility, pest control, and the satisfaction of growing your own garlic.
With patience and care, you’ll be able to enjoy the bold, savory flavor of garlic grown right in your home.