Orchids are often considered delicate plants, difficult to maintain, and often temperamental. Many of us have found ourselves looking at an orchid, once beautiful and flourishing, slowly withering, with leaves wilting and stems drying out. At that point, throwing the plant away seems like the easiest solution. But have you ever considered giving it a second chance? You’d be surprised at how an orchid, even when it looks like it’s dying, can regain its beauty with a little care and attention. In this article, we will guide you in saving these magnificent plants and teach you how to tell the difference between an orchid in dormancy and one that is truly lost.
Why does your orchid seem dead?
Before rushing to throw away an orchid that appears dead, it’s important to understand the reasons behind its decline. In their natural habitat, orchids live in symbiosis with trees, absorbing moisture from the air and receiving indirect sunlight. However, when grown indoors, conditions are not always ideal. Several factors can lead to the deterioration of the plant, such as:
- Excess water: One of the biggest enemies of orchids is overwatering. If the roots are constantly submerged in water, they begin to rot, causing the plant to deteriorate.
- Lack of light: Orchids need light, but not direct sunlight, which can burn their leaves. Poor lighting can weaken the plant and prevent it from photosynthesizing properly, making it more susceptible to diseases.
- Inadequate substrate: Orchids require well-drained soil that doesn’t retain excess water. If grown in overly compact or poorly aerated soil, the roots may suffocate and rot.
- Temperature fluctuations: Orchids are sensitive to temperature changes. A cold draft, excessive heat, or overly low temperatures can disrupt their growth and cause stress.
- Lack of nutrients: A deficiency in nutrients can also weaken an orchid and make it prone to diseases. Regular fertilization is essential to maintain the plant’s health.
Signs that an orchid is still recoverable
When you notice that your orchid shows signs of weakness, don’t be too quick to declare it dead. Sometimes it may look in bad shape, but it can still be saved. Here are some signs to look for to determine if your orchid is still alive:
- The roots: This is a good indicator of the orchid’s health. If the roots are green, firm, and slightly flexible, your plant is still alive. However, if they are brown, soft, and dry, they are likely rotting and need to be removed.
- The stem (or pseudobulb): Pseudobulbs are the thick “trunks” of orchids that store moisture and nutrients. If these parts are still firm and not hollow, the plant might be dormant and can be revived.
- Dormant buds: Sometimes invisible to the naked eye, dormant buds located at the base of the pseudobulbs can wake up if the conditions are favorable. Even if the plant appears dead, these buds can sprout when the orchid receives enough light, water, and nutrients.
- Aerial roots: Some orchids, particularly Phalaenopsis and Dendrobium, develop aerial roots that grow outside the substrate. If they are still well-hydrated and green, it indicates that the plant is still alive.
How to bring a tired orchid back to life
Once you’ve determined that your orchid can still be saved, here are the steps to take to revitalize it and give it a new lease on life.
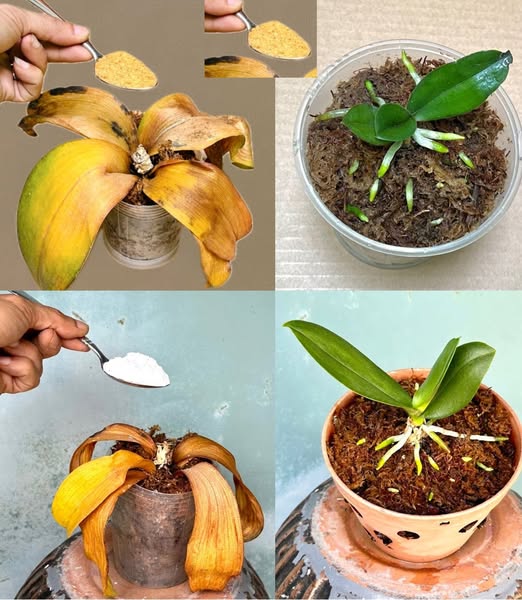
1. Trim dead parts
The first step is to cut off all the dead or rotten parts of the plant. Use well-disinfected garden scissors to remove damaged roots, dry stems, and any withered leaves. This will allow the orchid to focus on the healthy parts and prevent it from wasting energy on irrecoverable sections. Be careful not to cut too close to the roots or pseudobulb to avoid damaging the still-living parts.
2. Rehydrate the roots
If the orchid’s roots are dry, it’s important to rehydrate them. To do this, soak the base of the orchid in lukewarm (non-lime) water for about 15 to 20 minutes. This will allow the dried roots to absorb moisture and swell gently. If desired, you can also add a bit of diluted fertilizer to the water to stimulate root growth.
3. Provide an appropriate environment
Instead of directly repotting your orchid into a new pot, it’s best to wrap it in slightly damp sphagnum moss (a natural moss that retains water). Then, place it in a transparent container. This will help maintain constant humidity while allowing light to circulate without too much heat. The transparent container will also make it easier to monitor the health of the roots and prevent water from stagnating.
It’s important to ensure that the orchid is not submerged in water, as this could cause root rot. High humidity is beneficial, but stagnant water around the roots should be avoided.
4. Provide adequate light
Orchids need light to survive and thrive, but they do not like direct sunlight, which can burn their leaves. The best location for an orchid is near a window that receives indirect light, such as a window facing east or west. Exposure to light allows the plant to photosynthesize and regain energy for growth. However, be careful not to expose the plant directly to intense sunlight, as this could cause burns.
5. Be patient and watch for signs of recovery
Now that you’ve followed all the steps to revitalize your orchid, it’s important to be patient. Don’t be discouraged if you don’t see immediate results. Orchids can take some time to recover. Water sparingly and ensure a consistent humidity level without overwatering. After a few weeks, you may notice new roots or even young leaves, signs that your orchid is coming back to life.
6. Give yourself credit
After several months of attention and care, the reward can be spectacular: well-developed roots, new leaves growing vigorously, and eventually, blooming. The satisfaction of seeing your orchid revive after almost being discarded is immense, and you will realize that the effort was worth it.
The satisfaction of seeing an orchid bloom again
Bringing a tired orchid back to life is a long process, but how rewarding it is to see signs of recovery! The first new root that emerges, the first leaf that unfolds, and eventually, the first flowers that appear again are particularly gratifying moments. Not only have you saved a seemingly lost plant, but you’ve also learned to better understand the needs of these fascinating plants.
Conclusion
The next time you think of throwing away an aging orchid, remember that it may not be too late to give it a second chance. By better understanding its needs, caring for it with patience, and following a few simple steps, you could witness the revival of your orchid. With the right care, a tired orchid can come back to life, bloom, and continue to beautify your home for years to come. Never abandon an orchid that seems dead at first glance; with love and the right actions, it could surprise you again and again.