Making homemade bread might seem like a daunting task, especially with all the steps typically involved. However, this simple, no-knead bread recipe is a game-changer. It requires minimal effort, little active time, and only a few basic ingredients that are likely already in your pantry. Whether you’re an experienced baker or just starting, this bread will satisfy your craving for warm, fresh bread without much work.
Ingredients:
- Water: 200 milliliters (0.85 cups)
- Sugar: 25 grams (2 tablespoons)
- Yeast: 3 grams (1 teaspoon)
- Flour (for making bread): 300 grams (2 cups)
- Salt: 3 grams (1/2 teaspoon)
- Olive oil: 20 grams (2 tablespoons)
Mold Size: For a 450g loaf, use a mold that measures 20.8 centimeters long, 11.8 centimeters wide, and 11 centimeters tall.
Baking Temperature and Time: Bake in the oven at 170°C (340°F) for 25-30 minutes.
Instructions:
- Make the Liquid Mixture:
- In a large bowl, combine 200 milliliters (0.85 cups) of warm water, 25 grams (2 tablespoons) of sugar, and 3 grams (1 teaspoon) of yeast. Stir the mixture gently to dissolve the sugar and yeast in the water. This activates the yeast, which will help the dough rise.
- Let this sit for about 5-10 minutes, until the yeast is bubbling or foaming, showing that it is active.
- Combine the Dry Ingredients:
- Slowly add 300 grams (2 cups) of bread flour and 3 grams (1/2 teaspoon) of salt to the yeast mixture. Stir gently with a spatula or wooden spoon until the ingredients are combined and form a sticky dough. No kneading is required at this stage—just mix until there’s no dry flour left.
- Add the Olive Oil:
- Pour 20 grams (2 tablespoons) of olive oil into the dough. Use the spatula to mix it in until it’s fully incorporated. This will help the dough remain soft and give the bread a subtle richness.
- Let the Dough Rest:
- Cover the bowl with a clean kitchen towel or plastic wrap. Let the dough rest for 20 minutes. This allows the flour to hydrate fully, making the dough easier to work with.
- Rest Again After Mixing:
- After the initial resting time, stir the dough again to smooth it out. This step helps the dough rise without needing to knead it. At this point, the dough should still be slightly sticky but smooth.
- First Proofing:
- Cover the dough once again with a towel and place it in a warm, draft-free area. Allow it to rise for about 1 hour, or until it has doubled in size. This is the first proofing, where the yeast does its job of fermenting and expanding the dough.
- Prepare for Shaping:
- Once the dough has risen, sprinkle some flour on a clean surface to prevent the dough from sticking. Turn the dough out onto the floured surface and gently press it down to remove excess air.
- Using your hands or a rolling pin, press down on the dough to flatten it.
- Form the Dough:
- Gently fold the dough in half four times, creating layers, and then form it into a round shape. This step will help the dough maintain its shape during the second proofing.
- Divide and Mold:
- Divide the dough into 3 equal parts. Use your hands to shape each part into a tight ball by cupping your hands around it and rotating it. This creates a smooth top and tight bottom, helping the dough rise evenly.
- Let the Dough Rest:
- Place a towel over the dough balls and let them rest for 15 minutes. This brief rest allows the dough to relax, making it easier to shape.
- Shape and Prepare for Baking:
- Take each piece of dough and press it down gently into a flat strip. Turn it over, fold in the sides, and roll it out using a rolling pin to elongate it. Once the dough is stretched to the desired length, roll it up from the thicker end, squeezing the edge tightly to seal it.
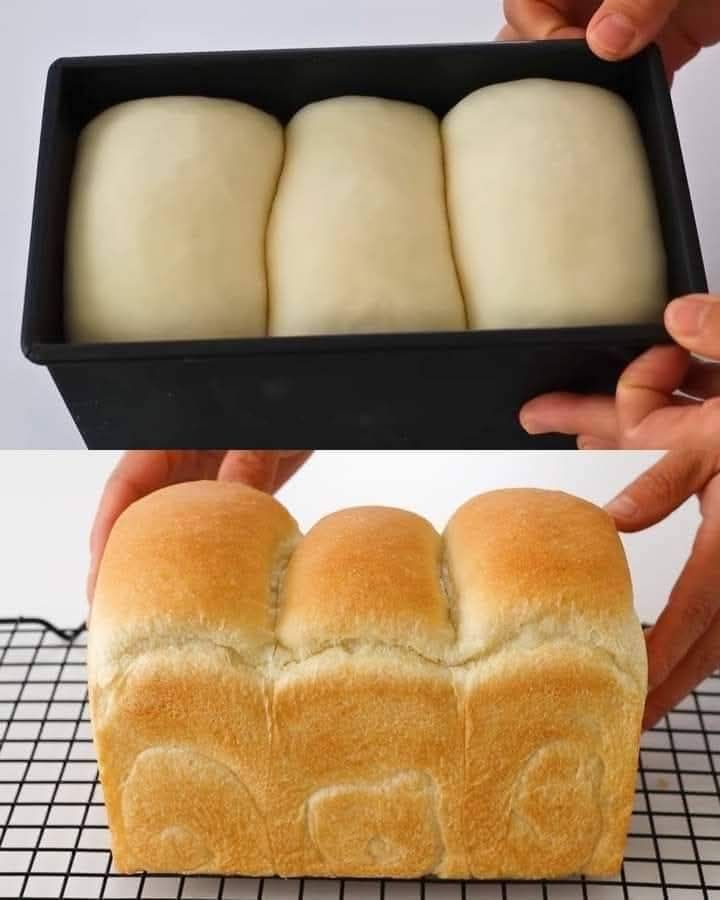
- Place each dough roll into your prepared mold (the 20.8×11.8×11 cm size for a 450g loaf). Repeat this with the other dough pieces.
- Second Proofing:
- Cover the dough in the molds with a cloth again, allowing it to rise for about 50 minutes or until it fills 80% to 90% of the mold’s height. This second rise will give the bread its final puff before baking.
- Baking the Bread:
- Preheat your oven to 170°C (340°F) while the dough is proofing. Once the dough is ready, bake it for 25-30 minutes. The bread should turn a golden brown color on top and make a hollow sound when tapped on the bottom.
- Cool and Serve:
- Once baked, remove the bread from the oven and let it cool for a few minutes in the pan before transferring it to a cooling rack. Allow the bread to cool completely before slicing. Enjoy the fresh, soft, and tender homemade bread!
Key Advice:
- Olive Oil Alternatives:
- If you don’t have olive oil or prefer a different taste, you can substitute it with vegetable oil, sunflower oil, or canola oil. Each will give a slightly different flavor, but all work well in this recipe.
- Oven Adjustments:
- Every oven is different, so keep an eye on the bread as it bakes. Adjust the temperature and time based on your oven’s unique characteristics to avoid burning the bread.
- Serving Suggestions:
- This bread is versatile! It can be enjoyed on its own, sliced for sandwiches, or toasted for breakfast. Spread butter, jam, or avocado on top, or even make a delicious grilled cheese.
- Storage Tips:
- Room Temperature: Store the bread in a sealed bag or container at room temperature for up to 3 days.
- Freezing: If you want to save some for later, wrap the bread in plastic wrap and place it in a freezer bag. It will stay good for up to 3 months. To enjoy, simply thaw and reheat.
Reasons to Enjoy This Dish:
- No Kneading: This bread recipe requires minimal hands-on time and no kneading, making it perfect for busy days when you want fresh bread without much effort.
- No Eggs or Butter: Ideal for those who have dietary restrictions or are simply looking for a lighter bread option without eggs or dairy.
- Soft and Fluffy Texture: The result is a soft, airy loaf that’s perfect for sandwiches or enjoying with a bowl of soup.
- Affordable: With basic pantry ingredients like flour, yeast, sugar, and oil, this bread is cost-effective and a great way to enjoy homemade goods without breaking the bank.
Commonly Asked Questions:
- Can I substitute whole wheat flour for bread flour?
- Yes, but be aware that whole wheat flour tends to absorb more liquid. You may need to add a little extra water to maintain the proper dough consistency.
- What alternatives can I use in place of sugar?
- You can replace sugar with honey, maple syrup, or other sweeteners of your choice. Just keep in mind that it may alter the dough’s texture or rise slightly differently.
- Can I make this bread gluten-free?
- Yes, you can use a gluten-free flour blend. However, gluten-free bread might have a slightly different texture, and it’s essential to use a flour blend that includes xanthan gum or another binder to help hold the dough together.
- Why is the second rise important?
- The second rise allows the bread to develop more flavor and improves its texture, creating a lighter, airier loaf.
- How can I store the bread to make it last longer?
- Store the bread in an airtight container or bag at room temperature. If you live in a humid area, you may want to refrigerate it to prevent mold.
- Can I add herbs or seeds to the bread?
- Absolutely! You can add herbs like rosemary or thyme or even seeds like sesame or sunflower seeds for extra flavor and texture.
- How do I know when the bread is done?
- Tap the bottom of the loaf. If it sounds hollow, it’s done. You can also use a thermometer to check the internal temperature—it should be around 93°C (200°F).
- Can I use instant yeast instead of active dry yeast?
- Yes! If you use instant yeast, you only need about 2 grams (3/4 teaspoon), and you don’t need to activate it in water first.
- Can I use a different pan to bake this bread?
- Sure! Just adjust the baking time based on the size and shape of your pan. Keep an eye on the bread as it bakes to prevent over-baking.
- Why is my bread heavy and dense?
- This could happen if the dough didn’t rise enough, was left to rise too long, or the flour-to-water ratio was incorrect. The dough should be soft and stretchy before baking.
Final Thoughts:
This no-knead bread recipe is perfect for anyone who wants to enjoy the comfort and satisfaction of homemade bread without all the effort. With just a few ingredients and a bit of waiting time, you can create a loaf that’s soft, fluffy, and full of flavor. Give it a try, and your kitchen will be filled with the irresistible aroma of freshly baked bread!